Thursday, May 8, 2014
Lowman
I had some trouble with lowman, especially the rig. The arms wouldn't move, and when they did, they snapped back into place. The feet also did some weird stuff too. If I had played with it a little more I might have been able to figure out, but I came up with a walk cycle that doesn't loop perfectly, but I'm happy with it.
Wednesday, May 7, 2014
Model built from NURBS curves and surface commands
Not quite sure what this is, but it's how it turned out. Looks almost like a flower pot.

Table - NURBS model from primitives

Tutorials/Lynda.com
I'm not sure if we supposed to include anything from the tutorials in the book, but I never documented that.
These are the Lynda tutorials I used:
http://www.lynda.com/Maya-tutorials/Maya-Essentials-2-Polygonal-Modeling-Techniques/96715-2.html
http://www.lynda.com/Maya-tutorials/Maya-Essentials-3-NURBS-Modeling-Techniques/96716-2.html
http://www.lynda.com/Maya-tutorials/Maya-Essentials-4-Creating-Textures-Materials/96717-2.html
http://www.lynda.com/Maya-tutorials/Photorealistic-Lighting-Live-Action-Maya/107983-2.html
I also looked up many things and watched many YouTube videos, some of which were helpful, while others were not as much.
Model of a real world object
Says it's optional - but my chair is modeled off of a real chair, and my midterm/final includes a model based off of a real world object: a Lego minifugure.
Final Project
Proposal
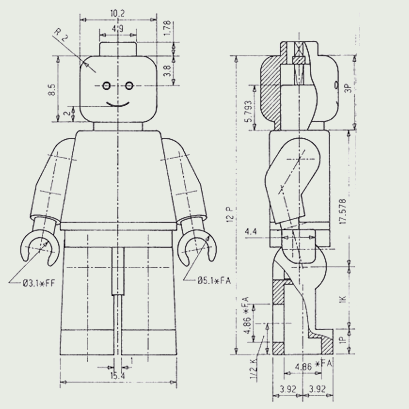
I wanted to recreate the Lego minifigure and then use shaders to recreate the object and use different shaders and textures to have 2 different characters that could interact with a recreated lego environment.

Research/Pre-production
http://www.creativebloq.com/3d/create-your-own-3d-lego-superhero-21410592
The above link is a website I used to help me figure out how to recreate this in Maya, but the directions were very unclear at certain points and I had to look up a lot of different things and had to improvise and do things I came up with on my own, which is why it ended up looking not exactly how I hoped.
When it was still available, I used various tutorials from lynda.com to learn more about polygons, since we did not really cover it in class, and also to learn about mental ray and how shading works for that. I also ended up using YouTube videos and written tutorials on various things, but it was not 100% helpful.
I also looked into seeing if there was any possible way to import these objects from different programs better, and it looked like there could have been a better method, but it involved many steps, several different programs I do not have, and a lot of things I do not know how to do.
I learned a bunch of different things and was trying this because the original plan was to have 2 characters within the same scene that would hopefully interact with other objects within the scene and have a full Lego environment, but do to time constraints, multiple problems, and unrealistic expectations, it failed to come together as I wanted.

Production Log
From the midterm, I had an ambitious vision of how I wanted this animation to turn out, and levels of what could possibly be achieved. It was almost like I had set checkpoints of where I would be satisfied, and then where I could go from each point.
First, I remade the torso to my liking, beveling the edges and making it work so when it was smoothed, it looked like it does in real life.

After this, I had tested many things and eventually figured out how to rig the character so that all the mechanical movements were true to how a Lego minifigure would actually move, which involved moving pivot points, parenting objects, and constraining objects by different parameters.

First, I remade the torso to my liking, beveling the edges and making it work so when it was smoothed, it looked like it does in real life.
After this, I had tested many things and eventually figured out how to rig the character so that all the mechanical movements were true to how a Lego minifigure would actually move, which involved moving pivot points, parenting objects, and constraining objects by different parameters.
Throughout this I watched various tutorials on all these steps and I also played with different things such as shading, texturing, lighting, and rendering. All that did not actually push me any further along with the project, but helped me to understand it more and see what would look better when I eventually was able to get to that step on the final piece. This also brought me many problems, but I was able to work most of them out, just not always in a timely fashion.

Continuing on I recreated the hip piece for the character which was difficult to think about how I would make it, but it ended up being a modified cube and cylinder put together and smoothed to recreate the shape that is the hip piece.

Next I went on to recreating the arms, which was the most difficult part for me because I thought I should be recreating the arms using cylinders, but that is not the true shape and topology, so I wound up using an sphere as the base of the shoulder and extruding a shape from there to make the rest of the arm.

From here I recreated the hands, which was arguably the easiest part since I had learned so many little tricks about how polygons work at this point, and I already knew how they looked. They have a simple geometry to them.

At this point I messed around with more shading and texturing, and learned about UV mapping, although I only used a simple UV map for the final outcome.


I moved on from here to try and add other lego bricks into the background, but I made a wall out of it and looks like a solid wall rendered out. I could not figure out how to fix this, but I will continue to look into it. I also created a path for the camera, that may not make sense and is just a random spin-around in the environment, but the camera stays aiming at the character the whole time, which is what I was trying to see that I could do, and since I was able to, I'm satisfied with how it came out.
A little more tweaking with lighting, animating the movements in the scene, and the textures, and I ended up with the final product.
Continuing on I recreated the hip piece for the character which was difficult to think about how I would make it, but it ended up being a modified cube and cylinder put together and smoothed to recreate the shape that is the hip piece.
Next I went on to recreating the arms, which was the most difficult part for me because I thought I should be recreating the arms using cylinders, but that is not the true shape and topology, so I wound up using an sphere as the base of the shoulder and extruding a shape from there to make the rest of the arm.
From here I recreated the hands, which was arguably the easiest part since I had learned so many little tricks about how polygons work at this point, and I already knew how they looked. They have a simple geometry to them.
At this point I messed around with more shading and texturing, and learned about UV mapping, although I only used a simple UV map for the final outcome.
I moved on from here to try and add other lego bricks into the background, but I made a wall out of it and looks like a solid wall rendered out. I could not figure out how to fix this, but I will continue to look into it. I also created a path for the camera, that may not make sense and is just a random spin-around in the environment, but the camera stays aiming at the character the whole time, which is what I was trying to see that I could do, and since I was able to, I'm satisfied with how it came out.
A little more tweaking with lighting, animating the movements in the scene, and the textures, and I ended up with the final product.
Self Evaluation
I did not get as far as I would have liked with the project since everything was taking longer than I hoped it would, but I am happy with what I ended up with. I put in a lot of work, and though it may not be completely visible in the final product, I know how each part came together and the work that went into each minor step of the process. Through the entire process I've learned the complexity to 3D modelling and animation, and have started to appreciate the real world movies and and media we see that use this. For example, a Pixar movie has scenes that are made up of hundreds if not thousands of models, really specific textures and lighting, and precise animation. The rendering time of a single frame for their films takes longer than all the rendering I had to do for this class. For something more close to what I did, I really appreciate all the work that went into the Lego Movie, even if they had some shortcuts that I didn't.Even though I did not get as far as I hoped with this project, I'm not giving up. After this class and over the summer I'm going to continue to work on this and see where I can get with it. I won't be trying to meet deadlines and having a time crunch and not having other classes to split my time with.
Subscribe to:
Posts (Atom)